I have installed Arch on laptops, desktops, and a couple of VMs I use for testing. The first time took an entire evening, and most of that was spent staring at lsblk trying to work out which disk was which. The install itself is not difficult. It is a list of small steps, and each step quietly assumes you already know a word like “mount” or “chroot.”
I wrote this because the guides I found skipped the parts I actually needed. It goes slowly, explains the vocabulary, and does not use archinstall. By the end you will have a UEFI system with GRUB, NetworkManager, a normal user account with sudo, and a desktop if you want one.
One warning before anything else. This guide wipes a disk. Not “might.” It will. Back up your files first. If you are dual booting Windows, stop and read the dual boot section of the ArchWiki before you touch anything. Shrinking a Windows partition is a different guide, and a good way to lose data. This one assumes the whole disk is yours.
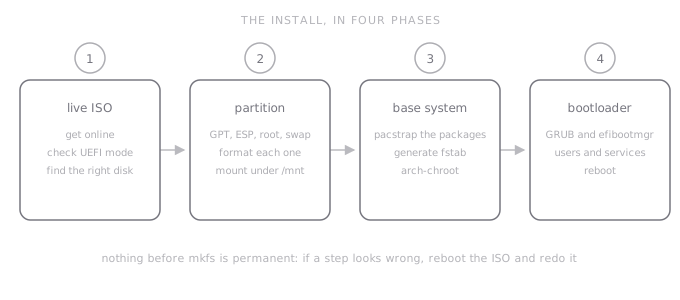
What you actually end up with
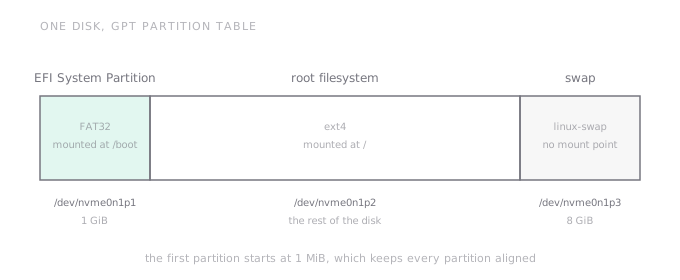
A single-disk UEFI install with three partitions:
- A 1 GiB EFI System Partition, formatted FAT32, mounted at
/boot. - An ext4 root partition that takes the rest of the disk.
- An 8 GiB swap partition.
GRUB as the bootloader. NetworkManager for networking. A user in the wheel group, which is the group that gets sudo. No desktop by default, then a section at the end for GNOME, KDE Plasma, or Hyprland.
That is a boring, reliable layout. Boring is good. You can add LUKS encryption, Btrfs snapshots, or a separate home partition later, once you know what you are doing. Trying to learn all of that during your first install is how people end up with a machine that does not boot and no idea which step broke it.
The words people skip
I am not going to pretend these are obvious. Here is the short version.
An ISO is a single file that contains an entire bootable system. The live environment is what runs when you boot that ISO. It lives in RAM, not on your disk, so you can use it to repair or install a system.
UEFI is the firmware that starts your computer. It replaced the old BIOS. On a UEFI system, the firmware reads a boot entry from a small chip and runs the bootloader from a FAT32 partition. That partition is the EFI System Partition, or ESP.
GPT is the partition table format. It is what describes where each partition starts and ends. MBR is the old format. If you have a disk larger than 2 TB, or a UEFI system, use GPT.
A partition is a slice of the disk. A filesystem is the format inside that slice. ext4 and FAT32 are filesystems. Formatting a partition creates a filesystem on it, and it erases whatever was there before.
Mounting is how Linux makes a filesystem visible at a path. When you mount your root partition at /mnt, everything inside that partition appears under /mnt. The ESP gets mounted at /mnt/boot, so the installer can put the bootloader and kernel there.
chroot means “change root.” It makes the installer treat /mnt as /, so commands like pacman and grub-install operate on your new system instead of the live ISO. It sounds scary. It is just a way of stepping into the install.
The kernel is the core of the operating system. The initramfs is a small temporary filesystem the kernel loads at boot so it can find the real root partition. GRUB is the bootloader: the menu that loads the kernel. The AUR is the Arch User Repository, a collection of build scripts maintained by users, not by Arch developers.
That is enough vocabulary for now. The rest will make sense as you use it.
Before you touch the disk
You need a USB stick with at least 2 GB, a working internet connection, and about an hour. A wired connection is easier. If you only have Wi-Fi, that is fine, but you will need to connect from the live ISO, and you will do it again after the first reboot.
Use another device to keep this guide open. Reading it on the machine you are about to wipe is a bad plan.
Go into your firmware settings and check three things.
- UEFI mode is on. Turn off CSM or Legacy Boot if those options exist. The install will not work the way this guide describes if you boot in legacy mode.
- Secure Boot is off. GRUB is not signed for your firmware, so Secure Boot will refuse to run it. You can set up Secure Boot later with
sbctlif you care. For now, disable it. - SATA mode is AHCI, not RAID or Intel RST. If your disk does not show up during the install, this is usually why. On some laptops the setting is called “SATA Operation” or “Storage Mode.” If Windows is already installed and you change this, Windows may stop booting. That is another good reason to back up first.
If you have a laptop with BitLocker, suspend or disable BitLocker before changing firmware settings or booting another operating system. You do not want to be the person who triggers a recovery key prompt with no recovery key.
Download the latest ISO from archlinux.org/download. While you are there, download sha256sums.txt and the .sig file. The filenames change with each release, so I am going to use archlinux-*.iso as a placeholder. Adjust the names to match what you downloaded.
Check the checksum:
sha256sum archlinux-*.isoCompare the output with the matching line in sha256sums.txt. If they differ, download the ISO again. A corrupted ISO can fail in strange ways halfway through the install.
If you want to verify the signature as well:
gpg --keyserver-options auto-key-retrieve --verify archlinux-*.iso.sigOn Windows, Rufus works. Choose the ISO, write it in DD mode if Rufus asks, and let it finish. Ventoy is even easier if you already use it: copy the ISO to the Ventoy USB and boot from it. On Linux or macOS, dd is fine:
sudo dd if=archlinux-*.iso of=/dev/sdX bs=4M status=progress oflag=syncReplace /dev/sdX with the USB device, not a partition. Run lsblk first. If the USB is /dev/sdb, the command is of=/dev/sdb, not of=/dev/sdb1. Writing to the wrong device here is a fast way to erase your disk before the install even starts.
1. Boot the ISO and check UEFI
Plug the USB in and reboot. Tap the boot menu key. It is usually F12, F11, F10, or Esc. On my ThinkPad it is F12. On the desktop it is Del. If you miss it, reboot and try again. The machine will not break.
Pick the entry that says UEFI next to your USB. If you pick the entry without UEFI, you are in legacy mode, and the rest of this guide will not line up.
Once you see the Arch boot menu, choose the first option and wait. You will land at a root prompt that looks something like root@archiso ~ #.
Check that you are actually in UEFI mode:
cat /sys/firmware/efi/fw_platform_sizeIt should print 64. If it says “No such file or directory,” you booted in legacy mode. Reboot and pick the UEFI entry. Do not continue. You will get to the end and GRUB will fail with “EFI variables are not supported on this system,” which is a frustrating way to learn this lesson.
If your keyboard is not US layout, load the right keymap now. For example:
loadkeys de-latin1localectl list-keymaps | grep de can help you find the name. Replace de with your language code. The default is us. This only affects the live session. We will set the installed system’s keymap later if you need to.
2. Get online
Plug in an Ethernet cable and run:
ping -c 3 archlinux.orgIf that works, skip to the clock check. If you are on Wi-Fi, use iwctl. It is an interactive prompt, so the commands below are typed after the [iwd]# prompt, not in your normal shell.
iwctl
device list
station wlan0 scan
station wlan0 get-networks
station wlan0 connect "Your Wi-Fi Name"
quit
wlan0 is the usual name, but device list will tell you if yours is different. The quotes matter if your network name has spaces. iwctl will ask for the password. If it says “No station,” check rfkill list and make sure Wi-Fi is not blocked by a physical switch.
Test the connection again:
ping -c 3 archlinux.orgIf ping archlinux.org fails but ping 1.1.1.1 works, you have a DNS problem, not a connectivity problem. Check /etc/resolv.conf. If both fail, you are not connected. Do not start pacstrap until this works. It will download several hundred megabytes.
Set the clock:
timedatectl set-ntp true
timedatectl status
This matters more than it looks. If the clock is wrong, TLS certificates look invalid, and pacman will fail to reach the mirrors with errors that do not mention the clock at all.
3. Find the disk
List your disks:
lsblk -fYou will see something like this:
NAME        FSTYPE   FSVER LABEL UUID                                 FSAVAIL FSUSE% MOUNTPOINTS
nvme0n1
├─nvme0n1p1 vfat     FAT32       1234-ABCD
└─nvme0n1p2 ext4     1.0         5678-EFGH
Or, on a SATA machine, sda, sdb, and so on. NVMe disks are named nvme0n1, nvme1n1, and their partitions add p1, p2, p3. SATA disks are sda, sdb, and their partitions are sda1, sda2. This is why every guide keeps telling you to check lsblk. The names are not cosmetic.
To see the size and model, which is what you actually care about:
lsblk -o NAME,SIZE,MODELWrite down the disk you want to erase. For the rest of this guide I will use /dev/nvme0n1. If yours is /dev/sda, replace it everywhere. If you are not completely sure which disk is which, stop. Unplug the other drives if you have to. The extra five minutes are worth it.
If the disk does not appear at all, go back to the firmware and check the SATA mode, or check whether the NVMe drive is seated properly. On some laptops, Intel RST hides the disk from Linux until you switch to AHCI.
4. Partition it
Here is the layout we are building.
Open parted on the disk:
parted /dev/nvme0n1You will get a (parted) prompt. Type these commands one at a time.
mklabel gpt
mkpart ESP fat32 1MiB 1025MiB
set 1 esp on
mkpart primary ext4 1025MiB -8GiB
mkpart primary linux-swap -8GiB 100%
quit
What each line does:
mklabel gptwrites a new GPT partition table. This erases the old partition table. It does not erase the data yet, but the old partitions are gone as far as the system is concerned.mkpart ESP fat32 1MiB 1025MiBcreates a 1 GiB partition for the EFI System Partition, starting at 1 MiB. Starting at 1 MiB instead of 0 keeps the partition aligned, which matters for SSD performance.set 1 esp onmarks partition 1 as an EFI System Partition. If you skip this, the firmware may not see it as bootable.mkpart primary ext4 1025MiB -8GiBcreates the root partition, starting after the ESP and ending 8 GiB before the end of the disk. The negative number means “8 GiB from the end.”mkpart primary linux-swap -8GiB 100%gives the last 8 GiB to swap.
Check the result before you format anything:
lsblk -f /dev/nvme0n1You should see nvme0n1p1 around 1G, nvme0n1p2 taking most of the disk, and nvme0n1p3 around 8G. If the sizes are wrong, redo the partition table. Nothing has been formatted yet, so this is still recoverable.
A few sizing notes, because the numbers are not universal.
The 1 GiB ESP is bigger than the 512 MB you will see in older guides. That is deliberate. Your kernels and initramfs live on the ESP because we mount it at /boot. A single kernel and initramfs can be 100 to 150 MB, and the fallback initramfs is another copy. If you install linux-lts as a backup kernel, 512 MB gets tight fast. Running out of space on /boot during a kernel update is a miserable way to learn this.
The 8 GiB swap is fine for a normal desktop. If you want to hibernate, swap needs to be at least as large as your RAM, and hibernation on Linux is its own adventure. If you have 32 GB of RAM and never hibernate, 8 GiB is plenty. If you have a very small disk, shrink swap or skip it and use zram later.
If you prefer a visual tool, cfdisk /dev/nvme0n1 does the same job with a menu. The commands above are easier to follow exactly, which is why I use them here.
If parted complains that the kernel cannot reread the partition table, run:
partprobe /dev/nvme0n1If that does not help, reboot the ISO and start again. The new partition table will be there.
5. Format it
This is the point of no return. Formatting writes new filesystems and destroys the old contents. Check the device names one more time.
mkfs.fat -F 32 /dev/nvme0n1p1
mkfs.ext4 -L root /dev/nvme0n1p2
mkswap -L swap /dev/nvme0n1p3
mkfs.fat -F 32 creates FAT32 on the ESP. It has to be FAT32. The firmware does not read ext4.
mkfs.ext4 creates the root filesystem. The -L root gives it a label, which is optional but makes lsblk easier to read.
mkswap prepares the swap partition. It is not a filesystem in the usual sense, so there is no mkfs step.
If any of these say the device is busy, it is mounted somewhere. Run findmnt and unmount it. The live ISO normally does not auto-mount your disks, but if a command says the device is busy, findmnt will show you where it is mounted.
Check the result:
lsblk -f /dev/nvme0n1You should now see vfat on p1, ext4 on p2, and swap on p3. If you see the old filesystems, you formatted the wrong device or the command failed. Stop and fix it before going further.
6. Mount it
Mount the root partition first:
mount /dev/nvme0n1p2 /mntThen mount the ESP at /mnt/boot:
mount --mkdir /dev/nvme0n1p1 /mnt/bootThen turn on swap:
swapon /dev/nvme0n1p3Check that everything landed where you expect:
findmnt /mnt
findmnt /mnt/boot
swapon --show
findmnt /mnt should show your ext4 partition. findmnt /mnt/boot should show the vfat partition. swapon --show should show the swap partition.
This ordering matters. The root goes on /mnt first, then the ESP goes inside it at /mnt/boot. If you mount the ESP first and then mount root over /mnt, the root mount covers the ESP and pacstrap cannot see it.
7. Install the base system
Now the long download. The command looks like this:
pacstrap -K /mnt base linux linux-firmware intel-ucode \
  sudo nano networkmanager grub efibootmgr \
  base-devel git man-db man-pages \
  pciutils usbutils alsa-utils sof-firmware bluez bluez-utils
If you have an AMD CPU, replace intel-ucode with amd-ucode. You can check with:
grep -m1 "vendor_id" /proc/cpuinfoGenuineIntel means Intel. AuthenticAMD means AMD. This is not a place to guess. The microcode package is loaded by GRUB before the kernel, and it fixes CPU bugs that the firmware may not have patched.
Here is what the packages are for, in plain terms.
| Package | Why it is there |
|---|---|
base |
The minimum Arch system: pacman, systemd, bash, core utilities |
linux |
The default kernel |
linux-firmware |
Firmware blobs for Wi-Fi, Bluetooth, graphics, and other hardware |
intel-ucode or amd-ucode |
CPU microcode updates |
sudo |
Lets your normal user run commands as root |
nano |
A text editor you can actually exit without a manual |
networkmanager |
Networking, including Wi-Fi |
grub and efibootmgr |
The bootloader and the tool that writes firmware boot entries |
base-devel and git |
Needed later to build AUR packages |
man-db and man-pages |
Manual pages, so man pacman works |
pciutils and usbutils |
lspci and lsusb, for troubleshooting hardware |
alsa-utils |
Basic audio tools, including alsamixer |
sof-firmware |
Sound Open Firmware, needed for audio on many modern laptops |
bluez and bluez-utils |
Bluetooth and bluetoothctl |
The -K flag tells pacstrap to initialize the pacman keyring in the new system. Without it, you can end up with signature errors on the first update. The current ArchWiki uses it, and I have never had a reason to leave it out.
One thing about firmware: linux-firmware is a meta package that pulls in the firmware files most systems need. Arch also ships split packages like linux-firmware-intel, linux-firmware-amdgpu, linux-firmware-nvidia, and linux-firmware-other. Those are useful if you are building a tiny image and know exactly which hardware you have. For a first install, use the meta package. Missing firmware can leave you with no Wi-Fi, no Bluetooth, or a black screen, and the error messages are not always obvious.
If this is your only machine and you want a safety net, add linux-lts to the command. It gives you a second kernel entry in the GRUB menu. If a kernel update breaks something, you can boot the LTS kernel and fix it. The cost is more space on /boot, which is why we made the ESP 1 GiB.
pacstrap is safe to rerun if the download fails halfway through. It will pick up where it left off. Do not reboot in the middle. If it fails with a keyring error, check the clock and your internet connection first.
8. Generate fstab
fstab is the file that tells the system which partitions to mount at boot. Generate it with UUIDs:
genfstab -U /mnt >> /mnt/etc/fstabThen look at it:
cat /mnt/etc/fstabYou should see three entries: the root partition, the ESP, and swap. They will use long UUID strings instead of /dev/nvme0n1p2. That is good. UUIDs do not change when you add or remove disks. Device names do.
If you accidentally run genfstab twice, you will get duplicate lines. Fix it by recreating the file:
rm /mnt/etc/fstab
genfstab -U /mnt >> /mnt/etc/fstab
Do not skip this check. A missing root entry means the system will drop to an emergency shell on boot, and you will be back on the ISO wondering what happened.
9. Chroot into the new system
Now step inside:
arch-chroot -S /mntThe -S runs the chroot in systemd mode, which is what the current ArchWiki uses. Plain arch-chroot /mnt also works. Either way, your prompt changes, and /mnt becomes /. If you run ls /, you will see the new system, not the live ISO.
From here on, do not prefix commands with /mnt. You are already inside. And do not use sudo: you are root in the chroot.
A quick sanity check:
pacman -Q linuxIt should print the installed kernel version. If it says the package is not found, you are not in the chroot, or pacstrap did not finish. Stop and check before continuing.
10. Time, language, hostname
Set the timezone. Replace Asia/Kolkata with yours. You can list the options with timedatectl list-timezones.
ln -sf /usr/share/zoneinfo/Asia/Kolkata /etc/localtime
hwclock --systohc
hwclock --systohc writes the current time to the hardware clock. Linux keeps the hardware clock in UTC by default, which is what you want for dual boot and for daylight saving changes.
Now the locale. Open the file:
nano /etc/locale.genFind the line that says #en_US.UTF-8 UTF-8 and remove the #. If you want a different locale, uncomment that one too. Save with Ctrl+O, press Enter, then Ctrl+X to exit.
Generate the locales:
locale-genSet the default:
echo "LANG=en_US.UTF-8" > /etc/locale.confUTF-8 is not optional anymore. It is how the system handles every non-English character, every emoji, and most of the text you will ever type. Use it.
If you use a non-US keyboard, set the console keymap now:
echo "KEYMAP=de-latin1" > /etc/vconsole.confReplace de-latin1 with the keymap you used earlier. The desktop environment has its own keyboard settings, which you can change after you log in.
Set the hostname. This is the name that shows up in your shell prompt and on the network:
echo "archbox" > /etc/hostnameReplace archbox with whatever you like. Keep it short and lowercase. Then create /etc/hosts:
cat > /etc/hosts <<'EOF'
127.0.0.1 localhost
::1 localhost
127.0.1.1 archbox.localdomain archbox
EOF
Change archbox in both places if you changed the hostname. The 127.0.1.1 line is not strictly required, but some programs use it to resolve the machine’s own hostname. Without it, sudo can pause for a few seconds before every command while it tries to resolve the name. That delay is confusing if you do not know where it comes from.
If you want the system clock to stay correct, enable the NTP client:
systemctl enable systemd-timesyncd11. Root, user, sudo
Set a root password:
passwdIt will ask twice and show nothing while you type. That is normal. Pick something you can remember, or store it in a password manager. Root is the emergency account. You will use your normal user for everything else.
Create your user. I am using human as the example. Replace it with your name.
useradd -m -G wheel -s /bin/bash human
passwd human
-m creates the home directory. -G wheel adds the user to the wheel group, which is the group we are about to give sudo access. -s /bin/bash sets the shell. Without -G wheel, your user will not be able to run sudo, and you will have to fix it from the ISO.
You will see older guides add audio, video, storage, and power to this command. On a modern system with systemd and PipeWire, those groups are mostly legacy. wheel is the one that matters. If you later find that something cannot access a device, add the specific group then, not now.
Now give the wheel group sudo rights:
EDITOR=nano visudoFind this line:
# %wheel ALL=(ALL:ALL) ALLRemove the # and save. visudo checks the syntax before it writes the file, which is why you use it instead of editing /etc/sudoers directly. If you make a mistake, it will tell you and refuse to save. That has saved me more than once.
Test it before you reboot:
su - human
sudo -v
exit
sudo -v asks for your user’s password, not root’s. If it works, you are done. If it says the user is not in the sudoers file, the wheel line is still commented out, or you forgot -G wheel when you created the user. You can fix it from the chroot now, or from the ISO later.
12. Services
Enable the services you want to start at boot:
systemctl enable NetworkManager
systemctl enable bluetooth
bluetooth is only useful if you installed bluez. If you skipped it, the command will fail with “Unit bluetooth.service does not exist,” which is harmless but confusing. Skip it if you did not install BlueZ.
Do not enable a display manager yet. We have not installed a desktop. The machine will boot to a text login prompt, which is exactly what we want for the first boot.
13. GRUB
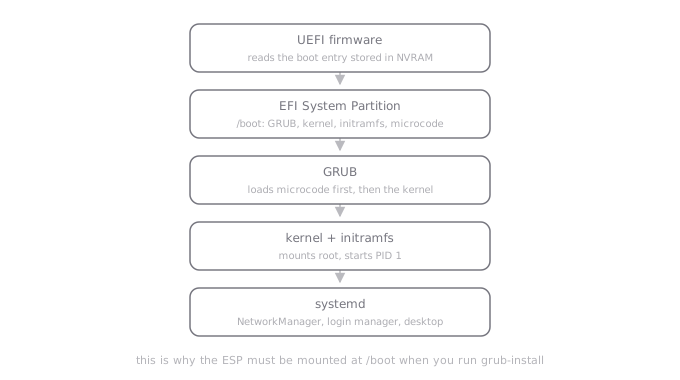
Here is what the boot chain looks like.
Install GRUB to the ESP:
grub-install --target=x86_64-efi --efi-directory=/boot --bootloader-id=ARCH --recheck--efi-directory=/boot tells GRUB that the ESP is mounted at /boot. This is the part people get wrong. If you mounted the ESP at /efi or forgot to mount it at all, grub-install will fail with “cannot find EFI directory.” Go back and check findmnt /boot.
--bootloader-id=ARCH is the name that appears in your firmware boot menu. You can use GRUB or anything else. I use ARCH because it is obvious.
--recheck makes GRUB re-detect the device map instead of trusting a cached one. It is not strictly required, but it costs nothing and avoids a class of weird errors.
Now generate the config:
grub-mkconfig -o /boot/grub/grub.cfgRead the output. You want to see lines like:
Found linux image: /boot/vmlinuz-linux
Found initrd image: /boot/initramfs-linux.img
If you installed intel-ucode or amd-ucode, check that GRUB actually included it:
grep -i ucode /boot/grub/grub.cfgYou should see an initrd line with /intel-ucode.img or /amd-ucode.img before the main initramfs. If the microcode is missing, the package is not installed, or you ran grub-mkconfig before installing it. Install the package and run grub-mkconfig again.
Check the firmware entry:
efibootmgr -vYou should see an entry named ARCH pointing at \EFI\ARCH\grubx64.efi. If you do not see it, the firmware may have refused the NVRAM write. Some laptops do that. The fallback is to install the removable path:
grub-install --target=x86_64-efi --efi-directory=/boot --bootloader-id=ARCH --removable
grub-mkconfig -o /boot/grub/grub.cfg
--removable writes to /boot/EFI/BOOT/BOOTX64.EFI, which firmware will boot even without an NVRAM entry. It is less tidy, but it works on machines with broken firmware.
One more thing: Secure Boot. If you left it on, GRUB will not load. Either turn it off in the firmware, or set up sbctl and sign the bootloader. Signing is a separate project. For a first install, turn Secure Boot off.
If you are dual booting Windows, GRUB needs os-prober and GRUB_DISABLE_OS_PROBER=false in /etc/default/grub to find it. That is outside the scope of this guide, mostly because the partitioning is different and I do not want you to erase Windows by following a single-disk tutorial.
14. Reboot
Leave the chroot:
exitTurn off swap, unmount everything, and reboot:
swapoff /dev/nvme0n1p3
umount -R /mnt
reboot
Remove the USB stick when the screen goes black. If you leave it in, some machines will boot the installer again and you will think the install failed.
If the machine boots to a GRUB menu and then a login prompt, the install worked. Take a breath. If it boots straight back to the firmware or to a Windows entry, see the troubleshooting section at the end. Do not reinstall yet. Most boot problems are a boot order or a missing ESP mount, not a broken system.
15. First login
Log in as your user, not root. The prompt will show the hostname you set, so it might say archbox login:.
The first thing to check is sudo:
sudo -vThen get online. If you have a wired connection, it should already work. For Wi-Fi, nmtui is the easiest path:
nmtuiChoose “Activate a connection,” pick your network, enter the password, and exit. If you prefer the command line:
nmcli --ask device wifi connect "Your Wi-Fi Name"--ask prompts for the password instead of putting it in your shell history. That is a small thing, but you should get into the habit.
Test it:
ping -c 3 archlinux.orgNow update the system:
sudo pacman -SyuThis may download a lot or almost nothing, depending on how recent the ISO is. Let it finish. If it updates the kernel, reboot before you install graphics drivers. Mixing a new kernel with an old driver is a common way to get a black screen.
Check the basics:
timedatectl
localectl status
If the time or locale is wrong, fix it now. It is much easier to fix before you have a desktop environment layered on top.
16. AUR and paru
The AUR is not a package repository in the normal sense. It is a collection of PKGBUILD files. You clone the build script, run makepkg, and it downloads the source and builds a package on your machine. That is why AUR packages can take a while, and why you should look at the PKGBUILD before you build something random.
paru is a helper that makes this less painful. You can build it from source, but that pulls in Rust and takes a while. The binary package is faster:
sudo pacman -S --needed base-devel git
git clone https://aur.archlinux.org/paru-bin.git
cd paru-bin
makepkg -si
cd ..
rm -rf paru-bin
makepkg refuses to run as root. That is intentional. Build AUR packages as your normal user, and let makepkg call sudo when it needs to install the result.
Once paru is installed, you can use it like pacman:
paru -S google-chromeA lot of older guides get this wrong. google-chrome is not in the official repositories. sudo pacman -S google-chrome will fail with “target not found.” It is an AUR package. If you do not want to use the AUR, sudo pacman -S chromium is in the official repos.
yay-bin is another fine helper if you prefer it. Pick one. You do not need both.
17. A desktop
The base install is a working Linux system. It is also a black screen with a login prompt. That is fine for a server, and a good way to learn, but most people want a desktop.
Here is the short version of the choice.
| Desktop | Best for | Display manager | How much it configures for you |
|---|---|---|---|
| GNOME | People who want it to mostly work | gdm |
Almost everything |
| KDE Plasma | People who like settings | sddm |
Almost everything, with more knobs |
| Hyprland | People who like tiling and config files | none by default | Almost nothing |
Install the audio stack first, because none of these desktops sound good without it:
sudo pacman -S pipewire pipewire-pulse pipewire-alsa wireplumber pavucontrolpipewire-pulse is the piece that PulseAudio applications talk to. pipewire-alsa does the same for applications that use ALSA directly. wireplumber is the session manager. pavucontrol is a graphical mixer, which is much easier to debug than staring at alsamixer.
For GNOME:
sudo pacman -S gnome
sudo systemctl enable gdm
sudo systemctl set-default graphical.target
gnome includes gdm, but you still have to enable it. If you want the extra GNOME applications, add gnome-extra. It is a large group and includes things like games, GNOME Boxes, and Builder. You do not need it to have a working desktop.
For KDE Plasma:
sudo pacman -S plasma sddm
sudo systemctl enable sddm
sudo systemctl set-default graphical.target
This is a common mistake. sddm is not part of the plasma group. If you install only plasma and then run systemctl enable sddm, systemd will tell you the unit does not exist. Install sddm explicitly. If you want the KDE applications, add kde-applications, but be warned: it is almost 200 packages. plasma alone gives you a working desktop and settings. Add konsole and dolphin if you want a terminal and a file manager without the whole group.
For Hyprland:
sudo pacman -S hyprland kitty waybar thunar rofi \
  xdg-desktop-portal-hyprland hyprpaper hyprlock hypridle \
  hyprpolkitagent network-manager-applet
Hyprland is a compositor, not a full desktop. You start it from a TTY with:
HyprlandThen you write config files for everything: the bar, the wallpaper, the keybindings, the lock screen. It is a great way to learn how a Wayland compositor fits together, but it is a terrible first desktop if you have never used Linux before. I would start with GNOME or KDE, get the machine working, and try Hyprland later when you have a fallback session.
Reboot after installing the desktop:
sudo rebootIf you get a graphical login screen, log in. If you get a black screen, press Ctrl+Alt+F3. That should give you a text login prompt. Log in there, check journalctl -b -p err, and fix the driver or session problem from the TTY. This is why the text login is useful: the desktop is not the only way in.
18. Graphics drivers
Most desktops pull in the basic Mesa stack, but you should check what your GPU actually is:
lspci -k | grep -A 3 -E "VGA|3D|Display"The Kernel driver in use line tells you what is already loaded.
For Intel graphics:
sudo pacman -S mesa vulkan-intel intel-media-driverintel-media-driver is for Broadwell and newer. If you have an older Intel GPU, use libva-intel-driver instead.
For AMD graphics:
sudo pacman -S mesa vulkan-radeon libva-mesa-driverFor NVIDIA, the answer depends on the card. Turing and newer (GTX 16xx, RTX 20xx and up) use the open kernel modules:
sudo pacman -S nvidia-open nvidia-utilsOlder cards use the proprietary modules:
sudo pacman -S nvidia nvidia-utilsIf you installed linux-lts, install the matching -lts driver package instead. A driver built for the wrong kernel will not load.
On a laptop with both Intel and NVIDIA graphics, install nvidia-prime and run games or GPU-heavy applications with prime-run. You do not need to disable the integrated GPU.
Do not blindly copy old advice about adding nvidia_drm.modeset=1 to your kernel parameters. The current packages usually set it for you. Check /usr/lib/modprobe.d/nvidia-utils.conf before you edit GRUB. If it is already there, adding it again does nothing useful and gives you one more thing to debug.
Reboot after installing a graphics driver. If you get a black screen, go back to the TTY, remove the driver, and check the ArchWiki page for your GPU. NVIDIA and Wayland have improved a lot, but they still have sharp edges.
19. Apps and fonts
Install the basics:
sudo pacman -S firefox vlc gimp libreoffice-fresh \
  noto-fonts noto-fonts-emoji ttf-jetbrains-mono \
  htop unzip zip
A few notes:
firefoxis in the official repos.google-chromeis in the AUR.chromiumis the official-repo alternative to Chrome.noto-fontsandnoto-fonts-emojicover most of the characters you will run into. Without them, half the web looks like empty boxes.ttf-jetbrains-monois a good terminal font. You do not need it, but your terminal will look better.htopis a process viewer. It is not required, but it is the first thing I install on every machine.
Try not to install everything at once. A minimal system that you understand is easier to maintain than a pile of packages you added because a blog post told you to. You can always install more later. That is the whole point of a package manager.
20. A firewall
Arch does not enable a firewall by default. On a desktop behind a home router that is not the end of the world, but it is a good habit:
sudo pacman -S ufw
sudo ufw default deny incoming
sudo ufw default allow outgoing
sudo ufw enable
sudo systemctl enable ufw
If you later install Docker, remember that Docker writes its own iptables rules and can bypass ufw. That is a separate problem with a separate solution. For a normal desktop, ufw is fine.
Keeping it alive
The install is a one-time thing. Keeping the system healthy is a habit, and it is a much smaller habit than people think.
Update regularly:
sudo pacman -SyuNot pacman -Sy. Not pacman -Syu once every six months. A partial upgrade, where you refresh the package database but do not upgrade the installed packages, is how you get library mismatches and strange breakage. If you are going to update, update everything.
Before a big update, especially if it has been a while, check the Arch news. The news is where they announce manual interventions, like a package rename or a config change that needs your attention. It is short and it saves time.
Clean the package cache once in a while:
sudo pacman -S pacman-contrib
sudo systemctl enable paccache.timer
paccache.timer runs weekly and keeps the last three versions of each package. Without it, /var/cache/pacman/pkg grows forever. You can also run sudo paccache -r by hand.
List orphaned packages:
pacman -QtdqRead the list before removing anything. Some packages are installed as dependencies but are still needed by something you use. If you are sure, sudo pacman -Rns $(pacman -Qtdq) removes them. If the list is empty, the command prints nothing. Do not run the remove command with an empty list, because pacman will complain that there are no targets.
Back up your files. Not the whole system, necessarily, but the things you would be sad to lose. An external drive and restic or borg is enough for a personal machine. A desktop environment can be reinstalled in an hour. Your photos and documents cannot.
Keep the Arch ISO around on a spare USB. It is a rescue system. When something goes wrong, you can boot it, mount your root partition, chroot in, and fix the problem without reinstalling.
When it breaks
Most install failures are one of a few things. Here is the short list.
The machine boots straight to the firmware or to Windows. The boot order is wrong, or the ARCH entry was not written. Boot the ISO, mount the root and ESP, chroot, and run grub-install and grub-mkconfig again. Then check efibootmgr -v. To change the order, run efibootmgr to see the four-digit entry numbers and pass them in the order you want, for example efibootmgr -o 0001,0000.
GRUB drops to a grub rescue> prompt. GRUB cannot find its config or the root partition. This usually means the ESP was not mounted at /boot when you ran grub-mkconfig, or the partition layout changed. Boot the ISO and reinstall GRUB from the chroot.
grub-install says “cannot find EFI directory.” The ESP is not mounted at /boot. Run findmnt /boot. If it is empty, mount the ESP and try again.
grub-install says “EFI variables are not supported on this system.” You booted the ISO in legacy mode. Reboot and pick the UEFI entry. There is no fix from inside the install.
No Wi-Fi after the first boot. Check rfkill list, then dmesg | grep -i firmware. If the firmware is missing, install linux-firmware (or the split package for your card) and reboot. If NetworkManager is not running, systemctl status NetworkManager.
No sound. Check that pipewire, pipewire-pulse, and wireplumber are running as your user:
systemctl --user status pipewire pipewire-pulse wireplumberThen open pavucontrol and check that the output device is not muted. On laptops, alsamixer can help you find a muted speaker or headphone channel. If dmesg mentions missing Sound Open Firmware, install sof-firmware.
Black screen after logging in. Go to a TTY with Ctrl+Alt+F3. Check journalctl -b -p err. If you just installed an NVIDIA driver, remove it, reboot, and read the wiki page for your card. If you are on Wayland, try an X11 session from the login screen to see whether the problem is the driver or the compositor.
Pacman complains about signatures or keys. Check the clock first. A wrong clock makes valid signatures look invalid. If the keyring is actually broken, boot the ISO, chroot in, and run:
pacman-key --init
pacman-key --populate archlinux
pacman -Sy archlinux-keyring
pacman -Su
This is the one time a partial refresh is acceptable. You need the new keyring before a full upgrade can work. Do not run pacman-key --refresh-keys on a clock that is wrong. It will take forever and fail.
You formatted the wrong disk. Stop using the machine. Every write makes recovery less likely. If you have a backup, restore it. If you do not, this is the painful lesson that convinces most people to start making backups.
If the system will not boot at all, the ISO is your rescue system. Boot it, connect to the network, and mount the installed system:
lsblk -f
mount /dev/nvme0n1p2 /mnt
mount /dev/nvme0n1p1 /mnt/boot
arch-chroot -S /mnt
From there you can reinstall GRUB, fix fstab, reset a password, or edit a broken config. When you are done:
exit
umount -R /mnt
reboot
This is also how you fix a broken sudoers file. visudo is careful, but everyone eventually edits something they should not.
The part nobody tells you
Arch is not a personality. It is a Linux system with the defaults removed. You choose the bootloader, the filesystem, the network manager, and the desktop. That is why the install feels long: you are making decisions that other distributions make for you.
The first install is the hard one. The second one takes twenty minutes, and you will wonder why it felt intimidating. The commands do not change. You just stop needing to look them up.
My advice is to keep notes. Write down your partition layout, your hostname, the packages you installed, and anything you had to fix. When you upgrade the machine or install Arch again, those notes are worth more than any guide, including this one.
And read the wiki. It is the best documentation in the Linux world, and it is written by people who actually run the system. When something breaks, search the wiki before you search a forum. The answer is usually there, with the exact command and the reason behind it.
You built this. You know where everything is. That is the point.
One last thing, since people ask: my own configs are at github.com/himonshuuu/dotfiles. It is an Arch and Hyprland setup with a Quickshell bar, a kitty config, and an install script that symlinks everything into ~/.config. It is my personal setup, not a framework, so take the parts that are useful and leave the rest.
Sign in with GitHub to join the conversation.